Aceso User Guide
DISCLAIMER
This user guide is provided by Phibonacci Creativo Sdn. Bhd. for informational and instructional purposes only. It is intended to assist users in utilizing the associated product or service effectively. While every effort has been made to ensure the accuracy and completeness of the information contained in this guide, Phibonacci Creativo Sdn. Bhd. makes no representations or warranties, express or implied, regarding its accuracy, reliability, or suitability for any specific purpose.
Phibonacci Creativo Sdn. Bhd. shall not be held liable for any errors, omissions, or misinterpretations of the content or for any actions taken based on the information provided herein. Use of this guide is at your own risk.
This guide is protected under copyright law and may not be reproduced, distributed, or disclosed without the prior written consent of Phibonacci Creativo Sdn. Bhd., except for personal or internal organizational use.
By accessing or using this guide, you agree to these terms. If you have any questions or require further assistance, please contact our Technical Support.
Get started
Recommended system requirements
Aceso is a cloud-based system. To use it you need an internet connection.
- If your network uses a firewall, make sure it allows outgoing HTTPS (port 443) connections.
- Use a modern web browser. We recommend the latest Google Chrome. JavaScript must be enabled.
- If your browser does not support the HTML5 date picker, enter dates as YYYY-MM-DD (for example, 2017-06-18).
Access the system
Open the unique web address given to your company by Phibonacci Creativo.

Look for the secure padlock icon in your browser's address bar. That means your connection is encrypted.
If there is no secure indicator, stop and contact your IT support. Possible causes include an outdated browser or operating system, malware on your device, or an unsafe network.
If you are not logged in, you will land on the login page. The company name shown on the login page confirms you are using the correct company instance.
First-time login
Your administrator must create your user account. The system generates a strong password automatically and keeps it private.
On your first login you must reset that password. If your email is a registered Google Account, you may also sign in with Google.
Reset password
You need access to the email address for your account to reset your password.
- On the login page click "Forgot password? Log in for the first time?".
- Enter your email and click "Send me a password reset link".
- Check your inCard. Whitelist emails from aceso@notifications.phibonacci.cloud. The email subject will be "Reset Password". If you don't see it, check your junk folder.
- Click the "Reset Password" button in the email. The link is single-use and expires after 60 minutes. If it expires, repeat from step 1.
- On the reset page enter your email and a new secure password. Use a complex password and avoid reusing passwords from other sites.
- After a successful reset the system will log you in and take you to the home page.
If you have trouble, contact our Technical Support.
Login
Open your company's web address. If you are already logged in, you will be taken to the home page.
Enter the correct email and password to sign in. After several failed attempts the system may temporarily lock your access. You can also sign in with a registered Google Account if available.
You can use the system from multiple devices at the same time, but do not leave devices unattended. Multiple users may use the system simultaneously.
If you forget your password, follow the steps in Reset password.
User interface
Aceso is responsive and works on different screen sizes. Your access to features depends on your user role.
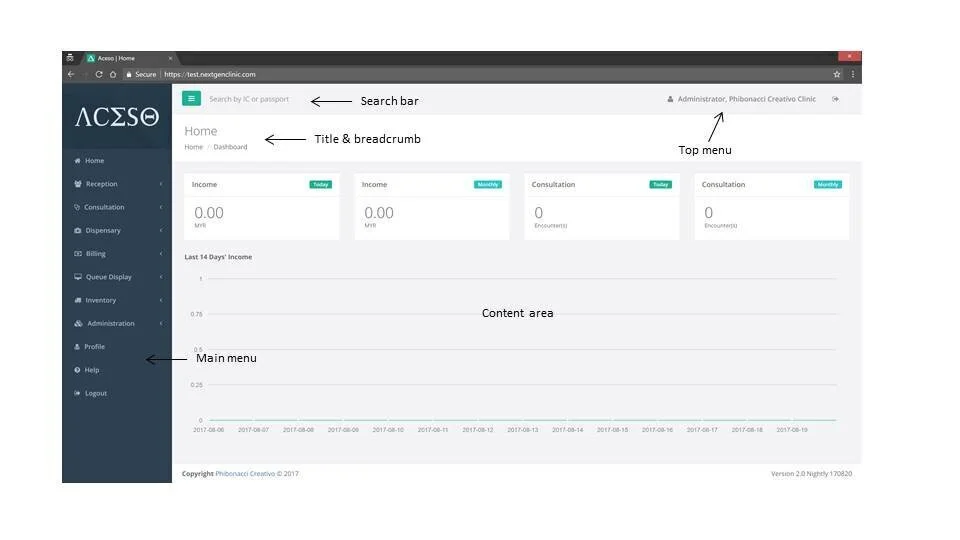
On large screens you will see the Main Menu, Search Bar, Top Menu, Title, Breadcrumb and View.
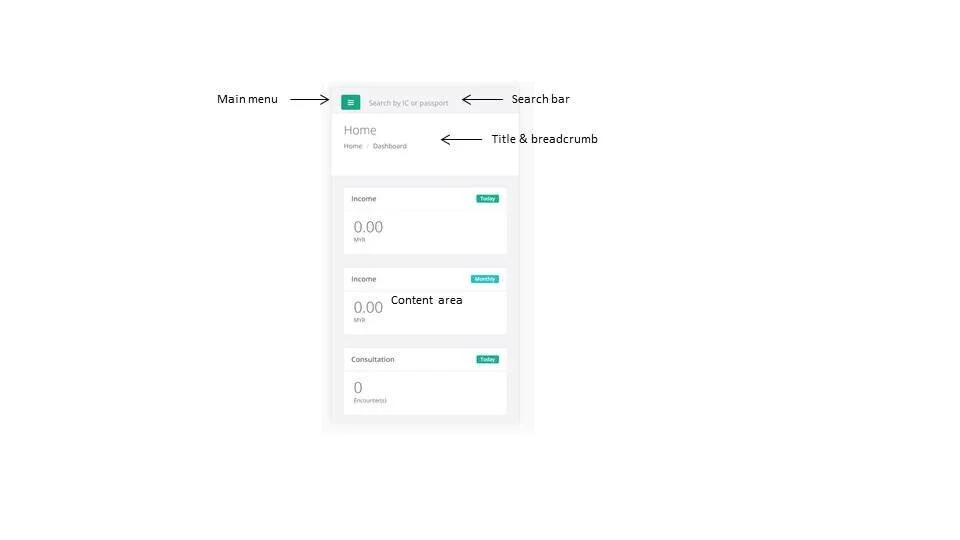
On small screens the layout shows a Main Menu Button, Search Bar, Title, Breadcrumb and View.
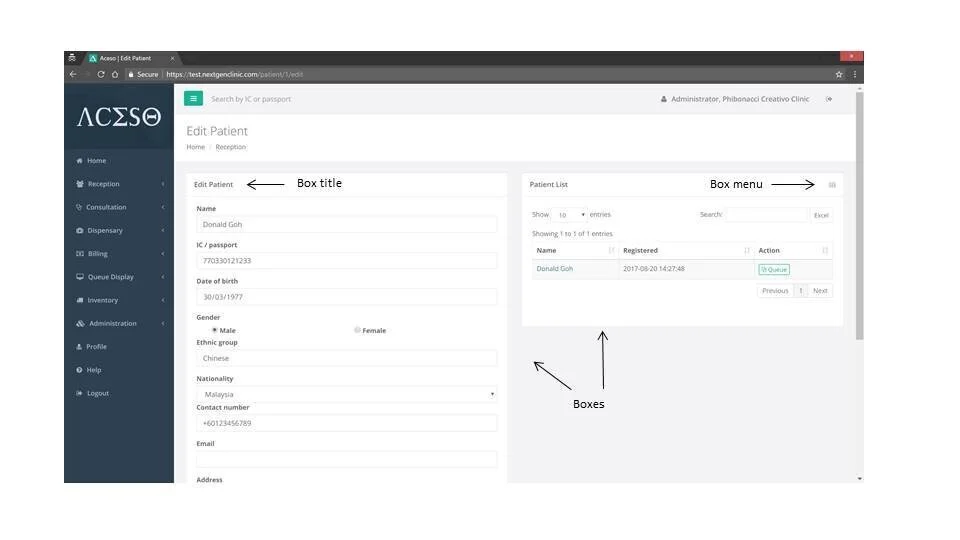
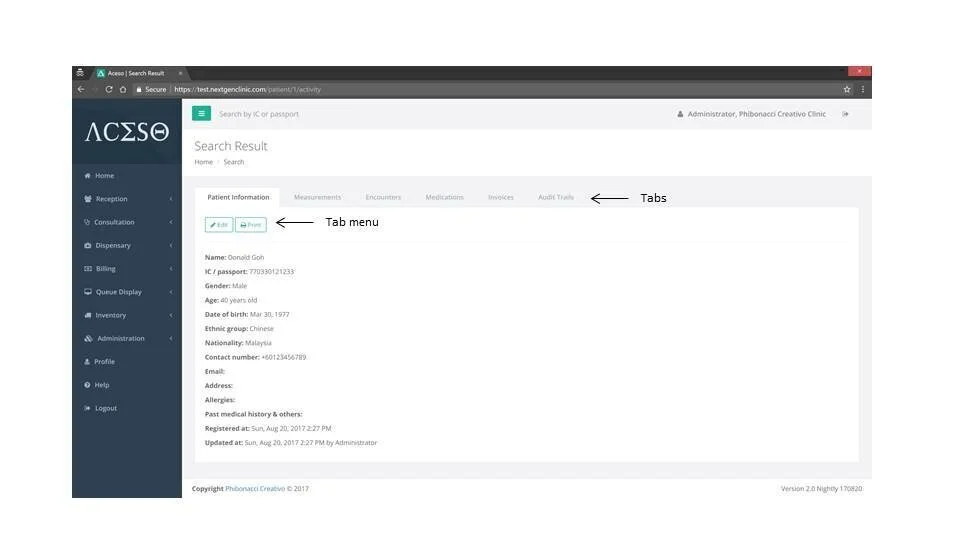
The View is made of cards or tabs. Each Card / Tab has its own Title / Icon, View and Menu.
Aceso uses Datatables to view large lists. You can sort and filter tables to find data quickly.
Logout
The system will log you out automatically after 24 hours of inactivity. Still, it's best to log out when you finish working.
- Click " Logout" in the Top Menu or Main Menu. You will be redirected to the login page.
Change password and edit profile
Although passwords do not expire automatically, we recommend changing your password regularly to reduce the risk of unauthorized access.
- Click your name near the top-right corner to open your profile page.
- Update your password and settings as needed.
Choose a strong, unique password and avoid reusing passwords from other services.
The station field is used for the queue display board to call patients.
System administration
Only users with the Administrator role can perform the initial setup and other administrative tasks described below.
Set up medical services
The system uses medical services to speed up encounter notes and billing. Services are grouped into Consultation, Procedure, and Imaging. Consultation services are automatically exempted from SST.
- Open the Main Menu and click " Administration" to expand the submenu.
- Click "Services."
- In the Add Service Card, enter the service category, name, classification, and price. If you do not use billing, enter 0 for the price.
- To edit a service, click its name in the Service List Datatable, then update details in the Edit Service Card.
- Override the service price for different Price Books, if applicable.
- To delete a service, use the delete option in the Edit Service Card Menu.
Note: Changing service data does not update existing invoices.
Set up medications and products
Medications and products are used for prescriptions, dispensing, inventory, and billing.
- Open the Main Menu and click " Administration" to expand the submenu.
- Click "Medications & Products."
- In the Add Medication Card, enter full medication/product name (include dosage form and strength), classification, price, and any other required fields. Enter 0 for price if you are not using billing.
- To edit a medication, click its name in the Medication List Datatable and make changes in the Edit Medication Card.
- Override the medication price for different Price Books, if applicable.
- To remove a medication, use the delete option in the Edit Medication Card Menu.
Note: Changing medication data does not update existing invoices.
Set up price books
Price books allow you to charge different prices for different patient groups, such as self-pay, insured, or corporate patients.
- Open the Main Menu and click " Administration" to expand the submenu.
- Click "Price Books."
- In the Add Price Book Card, enter a name for the price book.
- Adjust the prices for services and medications as required. Default prices are automatically pre-filled based on the values defined during service and medication setup.
- To edit a price book, click its name in the Price Book List Datatable and update details in the Edit Price Book Card.
- To delete a price book, use the delete option in the Edit Price Book Card Menu.
Inventory management
If your clinic provides pharmacy services, use the inventory module to track stock movements, maintain balances, and notify suppliers when stock reaches reorder points.
- Open the Main Menu and click " Stock" to expand the submenu.
- Choose "Stock In" or "Stock Out."
- Record reference notes, medication name, cost, and quantity to register a stock movement.
- Use the Card Menu to view stock movement history.
You can also adjust stock balances when needed:
- Open " Stock" from the Main Menu and select "Stock Adjustment."
- In the Adjust Stock Balance Card, enter the medication, the new/current stock balance, and notes.
- To view an adjustment record, click its timestamp in the Stock Adjustment List Datatable to open the adjustment page.
To configure stock alerts for a medication at a location:
- Open " Stock" and select "Stock Alert."
- Set the reorder (alert) point and add alert recipient email addresses. The system will send email alerts when stock hits the reorder point.
Manage users
Aceso is multi-user. Each person should have their own account. Actions are recorded with the author's information.
There are two main roles:
- Clinic Administrator — full access to setup, administration, and reports.
- Healthcare Professional — access for daily clinic tasks; administrative and reporting actions are limited.
- Open the Main Menu and click " Administration" to expand the submenu.
- Click "Users."
- In the Add User Card, enter the user's name, email, role, and location. Other fields are optional.
- To edit a user, click the user's name in the User List Datatable and update details in the Edit User Card.
- To deactivate an account, use the deactivate option in the Edit User Card Menu.
Deactivated users cannot log in.
To restore a deactivated user:
- From the User List Card Menu, click "Deactivated Users" to view the deactivated list.
- Click the user's name in the Deactivated User List Datatable to open their page.
- Click the "Restore" button to reactivate the account.
Manage buyers and payers
The invoice separates Buyer and Payer:
- Buyer — the person or organization receiving the product/service (for example, a patient or hospital). Used for e-invoicing.
- Payer — the entity responsible for paying the invoice (for example, the patient, insurer, or third party). Used for payment follow-up and credit terms.
To manage Buyers:
- Open " Administration" and click "Buyers."
- In the Add Buyer Card, enter the buyer name and other required information.
- To edit a buyer, click its name in the Buyer List Datatable and update details in the Edit Buyer Card.
- To deactivate a buyer, use the delete option in the Edit Buyer Card Menu.
To manage Payers:
- Open " Administration" and click "Payers."
- In the Add Payer Card, enter the payer name and credit terms. Other fields are optional.
- To edit a payer, click its name in the Payer List Datatable and update details in the Edit Payer Card. When you edit a payer, you can create or assign a price book to the payer. Price books may be configured globally or based on location, if applicable.
- To deactivate a payer, use the delete option in the Edit Payer Card Menu.
To restore a deactivated buyer or payer:
- From the Buyer/Payer List Card Menu, click "Deactivated Buyers/Payers" to view the deactivated list.
- Click the buyer/payer's name in the Deactivated Buyer/Payer List Datatable to open their page.
- Click the "Restore" button to reactivate the account.
Note: Changes to buyer or payer records do not update existing invoices.
Set up payment methods
Payment methods help categorize how collections are recorded.
- Open the Main Menu and click " Administration" to expand the submenu.
- Select "Payment Methods."
- To add a method, enter its name in the Add Payment Method Card.
- To edit a method, click its name in the Payment Method List Datatable and update it in the Edit Payment Method Card.
- To delete a method, use the delete option in the Edit Payment Method Card Menu.
Manage locations
Add each clinic or site as a Location so the system can separate queues and inventories per site.
- Open " Administration" and click "Locations."
- In the Add Location Card, enter the location name and any optional details.
- To edit a location, click its name in the Location List Datatable and update details in the Edit Location Card.
- You may assign a default Price Book to a location. When set, the location will use its assigned price book instead of the global default public price list.
- To delete a location, use the delete option in the Edit Location Card Menu.
Manage devices
Devices such as smart TVs or tablets used as queue displays should be added as Devices (not Users). Devices have minimal privileges and use a device ID and passcode.
- Open " Administration" and click "Manage Devices."
- In the Add Device Card, enter a device ID and select its location. The system will generate a random passcode for the device.
- To edit a device, click its ID in the Device List Datatable and update details in the Edit Device Card. A new passcode will be generated on update.
- To delete a device, use the delete option in the Edit Device Card Menu.
To log in a device as a queue display board:
- From the login page click "This is a queue display board" to go to the device login screen.
- Enter the device ID and its passcode to authenticate the device.
Advanced configuration
Advanced configuration controls system-wide settings. These settings can be changed or enabled by contacting our Technical Support. You can also review the current advanced settings for your instance on the Help page.
- Primary Administrator — the contact included in stock alert emails.
- Default next action after registration, measurement, immunizations, consultation, or dispensary — choose what the system does next by default.
- Default redirect page after billing — control where users land after completing billing.
- Measurement date — allow entering a custom date for measurements.
- Medical chit start date — allow entering a custom start date for medical chits.
- Prescription autocomplete source — choose between using the full medication list or only available items in inventory.
- Dispensing label template — customize the label (for example, omit header or include IC).
- Number of names shown on queue display — set how many patient names appear on the board.
- Currency code — set the clinic's currency.
- E-invoice and SST start dates — define the start dates for e-invoicing and SST.
- Invoice item description — choose full or brief descriptions for invoice items.
- Custom invoice date — allow entering a custom date for invoices.
- Invoice notification — allow automatically notify patients whenever an invoice is issued.
- Show IC on invoices — include the patient's IC number on invoices.
- QR code verification — enable QR code verification for receipts and medical chits.
- Custom payment date when marking invoice paid — allow entering a custom payment date.
- Custom item price during billing — allow overriding an item's price when creating an invoice.
- Custom report templates - use custom report templates for the system to use when generating reports.
- Hide columns in data tables — choose which columns to hide on screen in various Datatables.
Clinic operation
Register a patient
Aceso is a simple patient medical record system. It is easy to set up and maintain. You do not need MyKad readers or browser plugins to use it.
- From the Main Menu click " Reception" to open the submenu.
- Click "New Patient."
- Enter the patient's name, IC/passport, date of birth, gender, ethnic group and nationality in the Add Patient Card. Other fields are optional.
- To view a patient, click their name in the Patient List Datatable. That opens the patient's page.
- From the Patient Card Menu you can edit the patient, print patient information or card, add measurements, start a new encounter, create a dispensation, make an invoice, queue for consultation, or queue for billing.
When you edit a patient, the system automatically saves an original copy. Only the Clinic Administrator can retrieve that original copy.
Supported MyKad Reader:
For clinics on the Growth Plan or Private Plan, you may also purchase an Aceso-supported MyKad reader from us to speed up the patient registration process by capturing identification details automatically.
- The MyKad reader is supported on Windows operating systems only.
- A USB port is required to connect the device.
Record a measurement
You can record vitals such as blood pressure, pulse, height, weight, and blood glucose level (BGL).
- In the Main Menu click " Consultation" to open the submenu.
- Click "New Measurement" and enter the patient's IC or passport to continue.
- Fill in the measurements in the New Measurement Card. Patient information and previous measurements are visible for reference.
Measurements can be viewed in table or chart format. Advanced charts with clinical references (such as Weight-for-Age and Height-for-Age) are available. To view these charts, click the relevant measurement metric in the table.
Record immunization history
You can record a patient's immunization history to keep track of their vaccinations.
- In the Main Menu click " Consultation" to open the submenu.
- Click "New Immunization Record" and enter the patient's IC or passport to continue.
- Fill in the immunization details in the New Immunization Record Card. Patient information and previous immunization records are visible for reference.
Record a medical encounter
- In the Main Menu click " Consultation" to open the submenu.
- Click "Queue List" to attend a queued patient or "New Encounter" to enter IC/passport and start a new note.
- Write the encounter note. Patient details and past records are available on the page. If you type a prescription in the format "medication_description dosage frequency duration" (for example "Paracetamol 500mg tablet 2 TDS 3/7"), the system will calculate the dispensing quantity automatically. The medication name is auto-completed based on the inventory status or medication list while you type the prescription.
- To view an encounter note, click its timestamp in the Encounter List Datatable to open the note page.
- From the Encounter Note Card Menu you can edit, print, archive the note, print prescription or chit, fill a prescription, or queue for dispensation.
The system saves an original copy whenever you update an encounter note. Only the Clinic Administrator can retrieve that original copy.
Use order sets to speed up prescribing
Order sets are predefined prescriptions created for common diagnoses or treatment protocols. They help you quickly apply standard prescriptions during a consultation.
Before using order sets, you need to create one:
- In the Main Menu click " Consultation" to open the submenu.
- Click "Order Sets" to view existing order sets or create a new one.
- Click "New Order Set" and enter a descriptive name and the list of medications with their dosages and instructions.
Once an order set is created, you can use it during a medical encounter:
- Navigate to the Prescription section of the encounter note.
- Click "Copy from Order Set" and select the desired order set from the list. The medications from the order set will be added to the prescription list, and you can make any necessary adjustments before finalizing the prescription.
You should set clear, consistent naming for easy selection, regularly review and update your order sets to reflect current practices, and always verify prescriptions before saving to maintain patient safety.
Upload an addendum
You can attach files like photos, X-rays, or lab reports to a patient's record.
- In the Main Menu click " Consultation" to open the submenu.
- Click "New Addendum" and enter the patient's IC or passport.
- Add a short reference note and upload the file in the Add Addendum Card.
By default uploads are limited to 4 MB per file and only PDF, image, and Word files are supported. If your clinic needs other limits or file types, contact our Technical Support.
We do not enforce strict storage limits, but please upload only documents needed for patient care. Heavy users may be asked to reduce usage or upgrade their plan.
Record a dispensation
Dispensing must be checked and recorded by a pharmacist or dispenser.
- In the Main Menu click " Dispensary" to open the submenu.
- Click "Queue List" to work from the queue or "New Dispensation" to enter a patient's IC/passport and choose a prescription.
- Enter medication name and quantity to record the dispensation. Other fields are optional. Dose entry is required if you want to print a dispensing label. Patient details are shown on the page.
- To view a dispensing record, click the record's RN in the Dispensation List Datatable to open the dispensation page.
- From the Dispensation Card Menu you can edit, cancel, or print the dispensing label for a record.
Stock balances update automatically.
The system saves an original copy when you update or cancel a dispensing record. That original copy can only be retrieved by the Clinic Administrator.
Record an OTC dispensation
- In the Main Menu click " Dispensation" to open the submenu.
- Click "Over-The-Counter" to start an OTC sale.
- Enter medication name and quantity to record the sale. Other fields are optional. Dose entry is required if you want to print a dispensing label.
Medical billing
- In the Main Menu click " Billing" to open the submenu.
- Choose "Queue List" to work from the queue or "New Invoice" to enter a patient's IC/passport and start a new invoice.
- Select the billable encounters and medications to be included in the invoice, then choose the price book to be used as the pricing basis.
- The system automatically pre-selects a price book in the following order:
- Patient's default payer location-based price book
- Patient's default payer global price book
- Clinic's default location-based price book
- Clinic's default global price book (The public price list)
- Select payer, and buyer. You can adjust the total or apply a discount. Mark the invoice as "Saved", "Issued", or "Paid". Only "Issued" or "Paid" invoices are automatically emailed to patients and processed for e-invoicing. Invoices with buyer information are sent to LHDN automatically. Invoices without buyer details can be included in a consolidated e-invoice next month.
- The system automatically applies Service Tax based on the patient's nationality and payment status.
- To view an invoice, click its number in the Invoice List Datatable to open the invoice page.
- From the Invoice Card Menu you can edit, print the invoice, print the receipt, or print dispensing labels. Invoices and simplified invoices include a QR code that lets customers request an e-invoice by scanning it. Receipts link only to verification and show the total without item details to protect patient privacy.
You can edit, reprocess, or void Saved invoices. Paid and Issued invoices can only be voided (not edited) while their e-invoices are still voidable. Voided invoices can only be retrieved by the Administrator.
Only Administrators can submit consolidated e-invoices.
- In the Main Menu click " Billing" and select "E-Invoice List."
- From the E-Invoice List Card Menu click "Submit Consolidated E-Invoices."
Note: If you are on the Growth Plan or Private Plan, advanced configuration options are available. These include:
- Disabling email notifications
- Enabling custom item pricing
- Allowing custom invoice dates
- Allowing custom payment dates
To apply these settings, please contact our technical support.
Issue debit notes, credit notes, and refund notes
When an issued invoice requires correction, you can make adjustments by issuing a Debit Note, Credit Note, or Refund Note.
Debit Notes and Credit Notes can only be issued for unpaid invoices. For any refund involving a paid invoice, a Refund Note must be issued instead of a Credit Note. This ensures the system accurately updates collection reports and SST reports.
To issue a Debit Note, Credit Note, or Refund Note:
- Select the invoice from the Invoice Datatable by clicking its S/N.
- Click "Issue Debit Note", "Issue Credit Note", or "Issue Refund Note" from the Invoice Card Menu.
- Review the document details.
- Save or issue the document. Issued documents are automatically submitted to LHDN for e-Invoice purposes.
- To view a Debit Note, Credit Note, or Refund Note, click its document number in the Datatable.
- You may edit, print, or void the document from the Card Menu.
Generate a quotation
- In the Main Menu click " Billing" to open the submenu.
- Click "New Quotation."
- Enter the quotation details and save.
- To view a quotation, click its number in the Quotation List Datatable to open it.
- From the Quotation Card Menu you can edit or print the quotation.
View the public price list
- In the Main Menu click " Billing" to open the submenu.
- Click "Public Price List" to view the list.
- You can print the price list from the Price List Card Menu.
Queue management
Queue management is simple and requires no ticket printer. When you call or attend a patient, their name appears automatically on the queue display boards. You can also re-call or re-attend a patient from the queue history page, which is linked from the Queue List Card Menu.
Schedule an appointment
- In the Main Menu click " Reception" to open the submenu.
- Click "New Appointment" and enter the patient's IC or passport.
- Choose the appointment type and date. Other fields are optional.
- To edit an appointment, click the date & time in the Appointment List Datatable.
Patients can request appointments online at https://yourclinic.nextgenclinic.com/appointment/schedule — replace https://yourclinic.nextgenclinic.com with your clinic's assigned address. Requests appear as "To be confirmed" and must be reviewed manually.
Issue a time slip
- In the Main Menu click " Reception" to open the submenu.
- Click "New Time Slip" and enter the patient's IC or passport.
- Fill in the time slip details and save.
- To edit a time slip, click the date & time in the Time Slip List Datatable.
The system saves an original copy when you update a time slip. Only the Clinic Administrator can retrieve that original copy.
Refer a patient
- In the Main Menu click " Consultation" to open the submenu.
- Click "New Referral Letter" and enter the patient's IC or passport.
- The system can pre-fill the letter using the last encounter note. Edit and save as needed.
- To view a referral letter, click its reference in the Referral Letter List Datatable.
- From the Referral Letter Card Menu you can edit or print the letter.
Record a feedback or grievance
- In the Main Menu click " Reception" to open the submenu.
- Click "New Feedback or Grievance" and enter the patient's IC or passport if applicable.
- Enter the feedback or grievance details and save.
- To edit, click the date & time in the Feedback & Grievance List Datatable.
Dashboard & reporting
Dashboards and reports give you up-to-date views of your clinic's activity. They are designed to help administrators quickly understand trends and make decisions. They are not meant for very large data analysis — if a report is slow, contact our Technical Support for an alternate solution.
Administrator dashboard
The Administrator Dashboard appears when you log in. It shows key performance indicators (KPIs) at a glance so you can monitor the clinic’s health and activity.
Outreach report
The Outreach Report tracks recent patient registrations and shows trends in new patient sign-ups over time.
Attendance register
Clinics must keep a register of attendances, referrals, and deaths. Aceso automatically updates this register whenever an encounter note is saved.
Referral register
The Referral Register is kept automatically when you save referral letters in Aceso. It helps you track all outgoing referrals as required by law.
Prescription book
If your clinic dispenses medicines, you must keep a prescription book. Aceso updates the prescription book automatically from dispensing records.
Sales summary
The Sales Summary and Customer Statement show total sales for a chosen period. These help with payment follow-ups and financial reporting.
Sales report
The Sales Report shows daily sales totals and recent sales trends to help you monitor revenue flow.
Collection report
The Collection Report combines amounts from Receipts and Co-Payment Receipts. Receipts are created when invoices are paid; Co-Payment Receipts are created based on invoice's date. If payment methods are recorded on invoices, the report groups totals by payment type.
Gross profit report
The Gross Profit Report estimates the gross profit for a given period by comparing sales totals with the average cost of items sold. This helps you understand your clinic's profitability.
SST summary
The SST Summary shows the total Service Tax (SST) due to the government based on recorded sales and payments.
Aging report
The Aging Report lists overdue receivables so you can see which accounts need follow-up.
Billable
The Billable view lists patients with billable encounters or dispensations that still need to be invoiced or settled.
Stock valuation
Stock Valuation estimates the total value of your inventory using the average cost recorded during stock-in transactions.
Low stock
The Low Stock report lists items that are below their reorder level so you can restock on time.
Queue analysis
Queue Analysis shows the current average wait times in clinic and pharmacy areas, helping you identify bottlenecks and improve patient flow.
Setup E-Invoice
Connect to the LHDN E-Invoice API
To submit e-invoices or let your customers request theirs, you’ll first need to authorize Phibonacci Creativo to send e-invoices to LHDN on your behalf.
- Open https://myinvois.hasil.gov.my/ in Google Chrome and login.
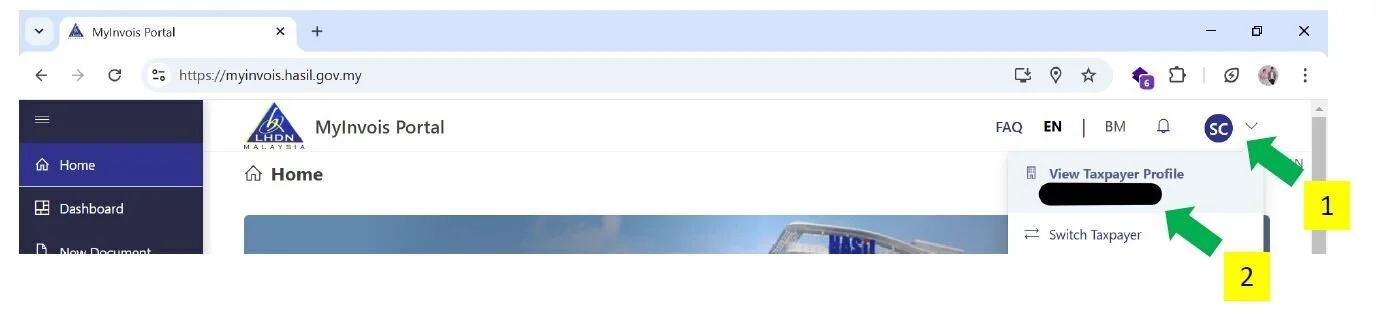
- At the top menu, click “MyInvois.”

- Click your profile icon at the top-right corner, then select “View Taxpayer Profile.”
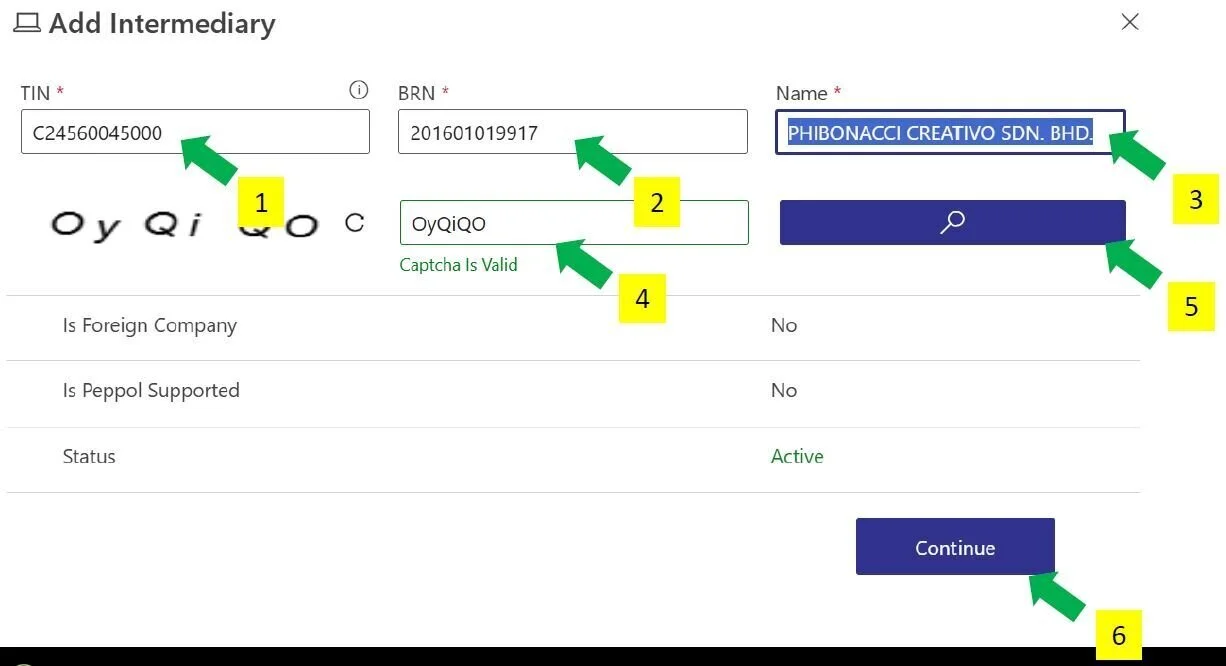
- On the Taxpayer Profile page, scroll to the bottom and click “Add Intermediary.”

- Add Phibonacci Creativo as your intermediary using the following details. The company name must be in ALL CAPITAL LETTERS with full stops.
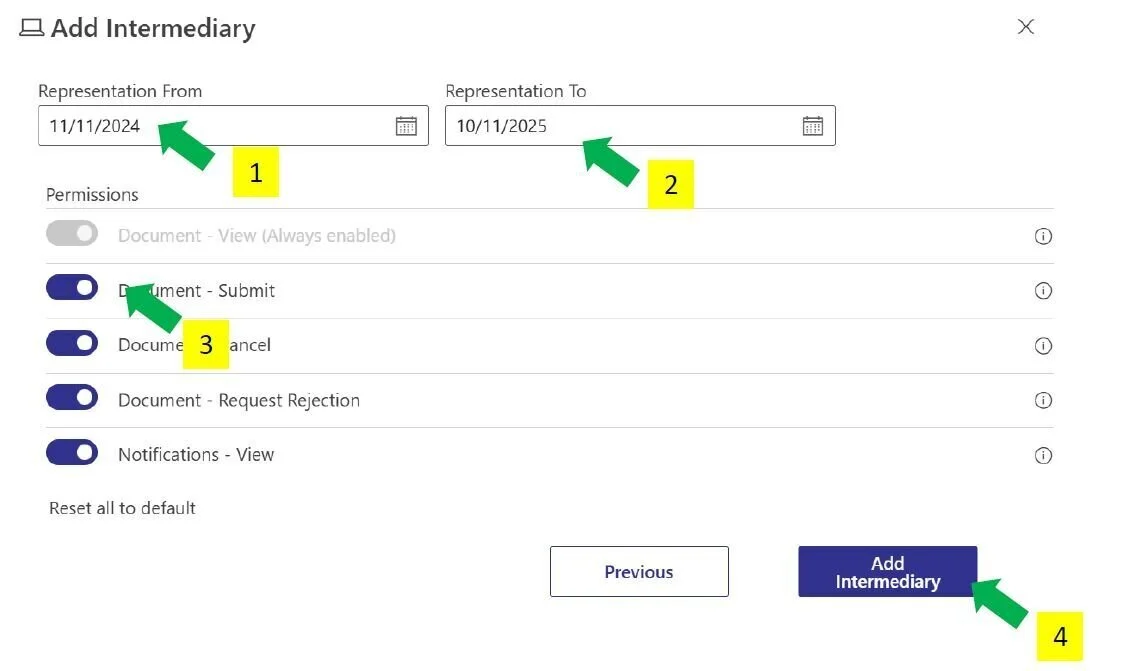
- Grant all permissions to Phibonacci Creativo for your subscription period.
Activate the E-Invoice Feature in Aceso
E-Invoice features are disabled by default in Aceso to prevent accidental submissions.
After you authorize Phibonacci Creativo on the MyInvois portal, please email our technical support team at help@phibonacci-creativo.com and inform us of your e-invoice commencement date. We will then activate the feature for you.
You can check your current e-invoice start date in the Advanced Configuration section on the Help page.
Review Classifications
Some items, such as medical examinations, vaccinations, and treatment for serious diseases, have special classifications defined by LHDN.
Before issuing e-invoices, please review and confirm your setup:
This ensures your items are classified correctly for e-invoice submission.
Billing as Usual
When billing a patient, select the buyer and payer if required.
If you choose “USE PATIENT INFORMATION” as the buyer, the system will automatically use the patient’s details (name, IC/passport, address, email, phone, etc.) A general TIN will be used. The e-invoice will be issued and submitted to LHDN automatically. This avoids the need to manually register each buyer one by one. If you’re unsure who should be selected as the buyer or payer, please refer to the official LHDN Healthcare FAQs.
If you bill a patient without buyer information, a normal invoice with a QR code will be issued. The patient can scan the QR code and submit the e-invoice themselves before month-end.
Consolidate Normal Invoices
By the 7th of the following month, you must consolidate all normal invoices and submit them to LHDN as a consolidated e-invoice.
- In the Main Menu click " Billing" and select "E-Invoice List."
- From the E-Invoice List Card Menu click "Submit Consolidated E-Invoices."
Need help? Technical support
We offer technical support for customers on the Growth Plan and Private Plan. If you are on one of these plans, you can contact us using the options below. Extra support (for example, 24x7 coverage or on-site help) is also available for an additional fee.
Support hours (8x5)
Monday to Friday, 9:00 AM to 5:00 PM (excluding public holidays).
How to contact us
Please include your account name, the site URL, a short description of the problem, and any screenshots or error messages when you contact us — this helps us resolve issues faster.
- Email: help@phiboacci-creativo.com
- Facebook chat: https://www.facebook.com/aceso.software
- WhatsApp chat: https://wa.me/60175251618
- Phone: +60175251618
If you need higher-level support (faster response times, 24x7 coverage, or on-site visits), please contact us and we will provide pricing and options.